Friday, May 21, 2010

CAMPING FUN!

For much of the year our Girl Scouts talked about wanting to have a "Camping" experience with all it's fun and Girl Scout traditions. With that in mind, the leaders got together and decided to make a special time for the girls with a Camping/Slumber Party at the school as an end of the year treat. We had a great time and will do our best to make this an annual troop event!

DAISY GIRLS

BROWNIE GIRLS

JUNIOR GIRLS

Our "Camping Fun" included:
(Click on separate links below for more details)-
  • BELOW~ 5 puffy eyed, exhausted, and beautiful leaders who would do it all over again for the sake of giving the girls a Girl Scouting Experience!

    Thursday, May 20, 2010

    Time for Set Up!

    For our "Camping Fun", we wanted the girls to actually sleep in tents as if we were camping outside. We had tents graciously donated for our use by Girl Scout parents and got them set up inside our school gym. The tents were large enough for each troop to have their own. Daisy Girls in one, Brownie Girls in one, and Junior Girls in one- with an extra tent left over!

    Camping indoors was great; since we live in South Texas, being indoors meant we did not have to deal with the hot humidity, the bugs/mosquitoes, other little critters, and the rain... which we DID have a down pour storm in the middle of the night. Thankfully, we were indoors!

    As the girls arrived, we had everyone set there stuff in a place along the wall until we had a chance to get the tents set up.

    ...setting up the tents...


    Melody and Kelsie, our two teen helpers for the night! Both of these girls have Brownie sisters and were former London ISD students. Thank YOU, girls for all your help!

    Sit Upons ~ A Girl Scout Tradition

    What is a sit-upon? They are homemade, usually waterproof pads used to protect the user's backside from the cold and damp while "sitting upon" the ground! They are also great for sitting any where the sitting surface is hard... a Girl Scout tradition for camping.

    We made our sit upons out of heavy duty table cloths bought at Wal mart (60x102 inches Oblong @ $5.00 each), yarn, old newspapers & plastic shopping bags. We decorated the sit upons with permanent markers and stickers. Each table cloth made 16 sit upons. ("How To" directions below). Here, the girls are decorating their sit upon covers.


    "Sit upons" ready to be sat upon!
    It had sprinkled rain earlier in the day and the ground was a little damp.
    Thank goodness we had our "sit upons" for enjoying the camp fire fun!

    HOW WE MADE OUR "SIT UPONS":
    • Pre-cut the tablecloth into rectangle sections with pinking shears. We cut our pieces into 12" x 15" sections since we had large sized table cloths for our large group of 24 Girl Scouts. Discard the side edge pieces since the corners are not square and it's extra fabric anyway.
    • Place two pieces together, insides facing each other.
    • Hole punch around all sides of pre-cut pieces. If your hole punch has a hard time going through, you may hole punch each piece individually. OR, forget the hole punch and yarn idea, and simply use Duct Tape to secure the edges.

    • Decorate the pre-cut pieces with permanent marker. We used a variety of colors as well as stickers. Have each Girl Scout put their name on their sit upon.
    • Cut long pieces of thick colored yarn to be used to stitch the edges closed.
    • Wrap scotch tape around each end to create a tight, hard end for the yarn to more easily go through the hole punches.
    • Stitch the outside edges on 3 of the 4 sides. The girls can stitch with a straight stitch or a whip stitch- whichever they choose. We also used colored pony beads to embellish the yarn as the stitches were done.
    • When 3 of the 4 sides are completed, stuff crunched newspaper and/or plastic shopping bags in the open end. DO NOT OVER STUFF.
    • Finish stitching the 4th side and tie securely.

    Your "Sit Upon" is now finished and ready to be sat upon!

    WHATCHAMACALLITS...
    A Girl Scout Tradition

    Special
    Whatchamacallits
    Affectionately
    Pinned
    Somewhere~


    SWAPS for short.

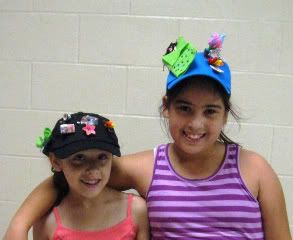
    We started making our SWAPS back in April in preparation of our "camping fun". During our "camping fun", the girls were given colorful baseball hats to display their SWAPS. We also had time to make a few more. Although we didn't trade like part of the tradition states, the girls had a great time.

    Thank you, leader Stephanie for coordinating the SWAP projects and supplying all the materials. This was such a wonderful idea!


    Photobucket

    Learning about Camp Fire Safety...
    and Singing Songs

    ... and having a fun time, too! Camp fires, singing song, and telling stories when camping... a girl scout tradition!

    Before we ventured outside to build our campfire, our Girl Scouts learned "Camp Fire Safety" by building their own Edible Campfire (idea found HERE). We went step by step building our edible campfire, discussing what we'll need to do and NOT do when we are at our real camp fire outside. A Camp Fire "Fun Patch" was earned for our camp fire time.

    Our "Edible Camp Fire"


    Do's:
    Keep long hair pulled back in a pony tail
    Stay behind the fire ring of rocks
    Enjoy our time singing songs and having fun
    Put out the fire with water, followed by burying it with dirt
    Be safe and follow rules

    Don't:
    Go past the fire ring without an adult
    Throw anything in the fire
    Go on the side where smoke is blowing
    Be unsafe


    Girl Scout, Lacy, holding our "talking stick", (made from a feather duster, decorated with ribbon and beads) sharing a funny story...


    Songs led by Daisy Girl Scout Leader, and "Master of Ceremony", Kristi. Leader, Teri, gives thumbs up for a great time!

    Lights Out...

    Our goal was to have the girls ready for bed and "Lights Out" by 10 PM for lights out... BUT, we were having so much fun outside with the camp fire, we didn't get back inside until around 10:15. Several of the older girls wanted to take showers, but of course we said, "No"... our camping needed to having a little "roughing it", so we offered up "cleaning with wipies". The girls had bathrooms to use, a roof over their head, airconditioning, and a place to brush their teeth. They could survive not taking a shower for one night. The girls were in bed with lights out by 10:30PM. It took about 45 minutes for the giggles, whispers, and extra trips to the bathroom before the Daisy and Brownie Girls were asleep. BUT WAIT! What about the Junior Girls?... well, let's just say they had a little adventurous side to them -supervised of course!. (pictures below)

    Daisy and Brownie Girls~


    Several long strings of "rope lights", covering about 80 feet across the floor, served as a lighted path from the tents to the bathroom door in case any one woke up in the middle of the dark night and had to use the bathroom. The rope light path also was a nice night light for the younger girls; the bathroom lights were kept on all night and the door was cracked open as well.


    Junior Girls~

    Having a little fun exploring the halls, finding their way to the school office. WHY? Because how many girls can say they roamed the school halls in the middle of the night and hung out in the school office in their P.J.s? Only a few I think!


    SSSHHHHHHH... don't tell any one we're in here.

    CAMPING FUN... Zipper Bag Omelets!

    Rise and shine... and time for Breakfast! For a fun treat, we had the girls make their own breakfast~ OMELETS! (see added note below)


    MMM-MMM GOOD!


    *It was brought to our attention by a fellow blogger, Susan, that cooking eggs in ziplock bags is NOT recommended. Susan provided a link with direct comments from Ziploc. See her complete comment in the comment section of this post. Thank you for the information, Susan!

    http://camping.about.com/od/campingrecipes/a/ziplocbaggies.htm.

    HOW TO MAKE ZIPPER BAG OMELETS:

    • Have guests write their name on a quart-size Ziploc freezer bag with permanent marker.

    • Crack 2 eggs (large or extra-large) into the bag (not more than 2) shake to combine them.

    • Put out a variety of ingredients such as: cheeses, ham, onion, green pepper, tomato, hash browns, salsa, etc.

    • Each guest adds prepared ingredients of choice to their bag.

    • Make sure to get the air out of the bag, zip it up, then gently shake and squeeze until mixed.

    • Place the bags into rolling, boiling water for 10-15 minutes.

    • You can usually cook 6-8 omelets in a large pot. For more, make another pot of boiling water.

    • When done, carefully remove bags from boiling water and let sit for a few minutes to cool.

    • Open the bags and the omelet will roll out easily.

    • Be prepared for everyone to be amazed. Nice to serve with fresh fruit and coffee cake; everyone gets involved in the process and a great conversation piece.